Final Image

Step 1 – Textile
We’ll start with a textile fabric; you can find the texture
here. The size of the document doesn’t matter, so you can work directly with
the size of the texture, If you want to print it, work with CMYK, if not, work
with RGB; we are going to experiment, so you can work with anything you like,
such as 1 color logos, type, or vectors. In my case, I used the Psdtuts logo.

Step 2 – Textile
We need to prepare the logo to blend into the texture by
creating a Displacement Map, this will alter the silhouette of the object,
making it irregular and leaving it ready to work within the texture. Duplicate
the texture layer and desaturate (Cmd/Ctrl + Shift + U); then select the
desaturated layer (Cmd/Ctrl + A), copy the layer (Cmd/Ctrl + C), make a new
document (Cmd/Ctrl + N) and paste it inside (Cmd/Ctrl + V), save it as
displace.psd and close it.

Step 3 – Textile
Now, let’s apply the displacement map to the logo, select
the object you are working with and go to filter. Go to Filter > Distort
> Displace, then in the Displace Window type 3 on horizontal and vertical
scale, make sure the options Stretch to Fit and Repeat Edge Pixel are selected
too, and select ok; then you will select the displacement map you made for this
texture (displace.psd) and select open; after doing this step, take a look at
the result, if it’s too distorted, perhaps you will have to try one value down,
if it’s not much of a change, then, you need to go up on the values.

Step 4 – Textile
Now we are ready to start making the burn effect. Keep in
mind that this effect involves a little bit of practice with the burn tool,
this is because the Burn Tool reacts differently with each texture, this also
depends of the Range and Exposure of the brush you are using, so it’s not
certain to get the result you expect. Before you start, remember that you will
be burning the texture, this means that you can’t go back, modify or move the
burn, so I suggest you duplicate the texture and give it a try with the Burn
Tool, once you got the feel of it, duplicate a clean texture and layout all the
things you are about to burn in the place you want them.
I recommend to use soft brushes and do a few passes playing
with the Range (Highlights, Midtones and Shadows) as well with the Exposure and
size of the brush. This effect needs practice and detail to really make it look
really good.
Let’s make a selection of the object, in this case the logo
and then move to the texture layer, select the Burn Tool and start exploring
how it behaves.

Step 5 – Textile
After you’ve got the result you are looking for with the
Burn Tool it should look similar to this result that blends with the texture;
this can work by itself, but we can still make it better by adding some lights
and shadows. Duplicate the texture and move it above all layers and name it
Overlay, then Desaturate (Cmd/Ctrl + Shift + U), change Layer Blend Mode to
Overlay at 40% Opacity. Make a new layer above the Overlay layer, select a soft
white brush and make it a size that can fit all the object, brush blend mode
set to Normal and 100% Opacity; then set the Layer Blend Mode to Overlay at
40%. We are now finished with the textile texture.

Step 6 – Paper
Let’s move on to a paper texture, the process will be
exactly the same as it was with the textile texture, just remember to explore
how the Burn Tool will react with the paper texture; to make it more
interesting, we will blend some paper textures and play around with the Hue and
Saturation as well with the Burn Tool to make an interesting texture to work
with.
You can find some interesting textures here (old paper) and
here (texture paper); make a new document and put them together, we’ll use
shape of the texture paper (make them the same size no matter if you stretch
them to fit), make a selection of the texture paper silhouette, select the old
paper and Inverse the selection (Cmd/Ctrl + Shift + I) and erase, you will end
up with this.
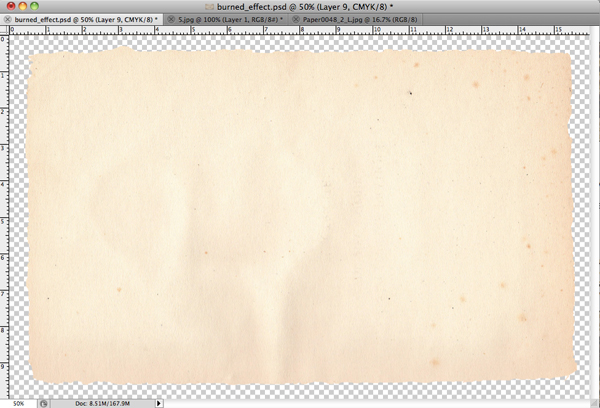
Step 7 – Paper
Remember that this is a new texture, so you have to test how
the burn will work on it, so duplicate this layer just in case. The old paper
texture looks very pale, go ahead and play with the Hue and Saturation
(Cmd/Ctrl + U), then with the Burn Tool go work on the edges to burn and some
parts of the center too.
Move the texture paper above and set the Layer Blend Mode to
Linear Burn at 90% Opacity, duplicate the layer (same blending mode) at 90%
Opacity, it will look something like this.
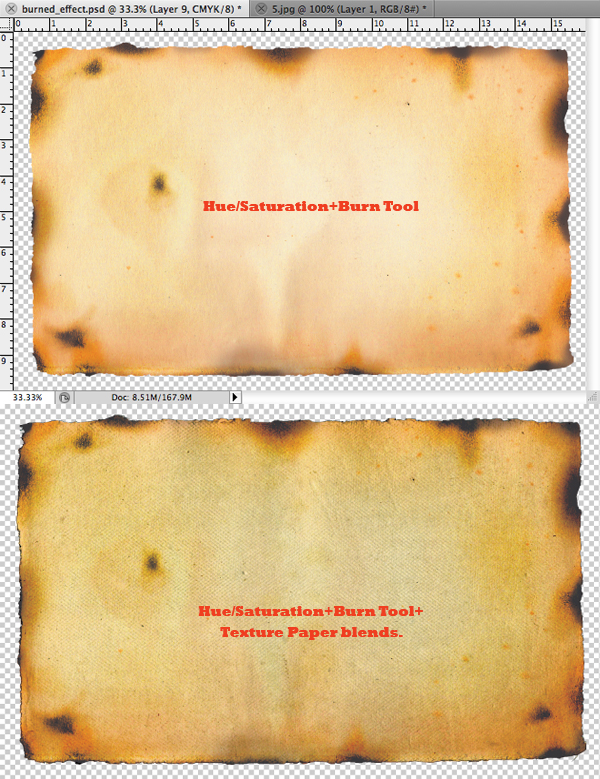
Step 8 – Paper
To save some time and steps, let’s use the same object you
used in the earlier exercise, it will already have the displace filter applied
to it to make it blend with the texture.
Remember to duplicate the old paper texture to practice,
then make a selection of the object and start burning, pay attention how the
burn tool reacts with this new texture, when you are done, it should look
something similar to this.

Step 9 – Paper
Now we have a good burn on paper that can work, but let’s
add some more details for a better result. Duplicate the texture paper and move
it above all layers and name it Overlay, then Desaturate (Cmd/Ctrl + Shift +
U), change Layer Blend Mode to Overlay at 40% Opacity. Make a new layer above
the Overlay layer, select a soft white brush and make it a size that can fit
all the object, brush blend mode set to Normal and 100% Opacity; then set the
Layer Blend Mode to Overlay at 40%.

Final Image
Now that you know the power of this tool, keep exploring it;
check out the results you can achieve with this tool, here are some examples I
made. This is a very basic and easy effect, just need some experimentation in
order to get the feel of the Burn Tool, it has a lot of potential if you know
how to use it and how to combine it to get awesome results. I encourage you to
give it a try on new textures, see how it works, keep trying and practicing;
sometimes basic things are the ones that take the final piece to another level;
if you want to keep trying out this tool with other textures I recommend you
check out CG Textures.


0 komentar:
Your comment / Apply a Burned Effect to Different Textures