Create a Scenic Landscape Composition in Photoshop Part-5

0 komentar Jumat, 30 Maret 2012 di 06.13 - Edit entry?
Create a Scenic Landscape Composition in Photoshop Part-5


Step 41

Select and duplicate two birds and scale them up. Put them like below to make it look like they are flying towards screen. Also create mask on this layer and erase some hard edges to make them fade into background.


Step 42

Then paint some strokes of "f1f3ce" color on new layer, on the right side of our image to cover this tree. Again, make mask on this layer and use low opacity big round soft brush (black) to erase this strokes a bit and create something like fog. You can also simply lower the opacity of this layer but I’m used to do masking-thing so I did that in psd file.


Step 43

Here is short process of copying tree from right side and pasting it to left side (on the top of cliff). After that, paste it on tree on the top, to make it look more natural by adding some leaves. Check out images for "Brightness/Contrast" and "Color balance" values.


Step 44

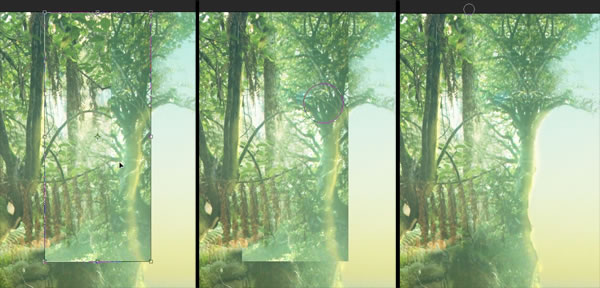
Create new layer with "Color" blending mode and paint some blue strokes to cover light-yellow areas. Sky on right side Is fading to blue so we have to make sky behind trees blue too. Then lower the opacity of this layer (image 2).


Step 45

Go back to girl layer and use "Sponge tool" to lower the value of highlighted areas, like on image 2. Use 50% flow setting on that one. Try to do the same on branches near her legs and on other parts of this stock where light is too orange.


Step 46

Now select "Brush tool" and hit "Q" – you will switch to quick masking mode – your brush will become red, paint some strokes on trees layer like in image 1. Then hit "Q" again and your strokes will convert to selection, hit Shift + Ctrl + I to invert selection. Now hit Command/Ctrl+B and choose values like on image 2 (-21, 0, +34 for "Highlights"). Faraway jungle will become bluer, like the sky behind it.


Step 47

Go to left trees layer and select branches like on image, then hit Command/Ctrl + J to duplicate them onto new layer (“Layer 17), hit Commad/Ctrl + T and right-click, select "Flip horizontally" then rotate it a bit. It should look like this:


Step 48

After some erasing job it looks like this:


Step 49

Go back to left trees layer and use "Clone stamp tool" to cover branch on the left – like here.


Step 50

Some steps while using "Clone stamp tool".


Step 51

As final step, do add some slight blur treatment to butterflies and "fake tree" to fit them into whole composition, use 0.3 pixels Gaussian blur:


Final Image


Adsense Indonesia

Create a Scenic Landscape Composition in Photoshop Part-4

0 komentar di 06.02 - Edit entry?
Create a Scenic Landscape Composition in Photoshop Part-4


Step 31

Duplicate this branch onto new layer and scale it down (Command/Ctrl + T), move it a bit from original position and lower opacity of its layer.


Step 32

Duplicate branch from girl stock and flip it horizontally. Put it on this tree, then erase some parts of this branch to make it look like it’s behind the tree.


Step 33

Then brighten up these branches a bit using “Brightness/Contrast” window, to make them fit background.


Step 34

Use "Lasso Tool" to select one of branches that was standing out a bit, move it to the left.


Step 35

Now smooth jeans material to make it look like normal pants. Do it by painting some strokes with "Smudge Tool" with 4% strength, using soft round brush while stroking. Also cover some parts with "Clone tool" (circled areas).


Step 36

Then open "butterflies stock" and copy some of them to our image, Use "Magic wand tool" to cut out blue areas (roughly), then erase some blue pixels with "Eraser tool". After that, select one of butterflies, rotate and place it (again, Command/Ctrl + T) near shoulder of our girl.


Step 37

Here is how it looks after rotating and placing butterflies. Also cut out each butterfly (select one and hit Command/Ctrl + X) then paste them on separate layers (more comfortable to edit later on) and set each layer to “Linear Dodge (Add)”. Then on layer with butterfly behind her shoulder hit Command/Ctrl + U and select these values to change color of butterfly to more yellow. Do the same for other butterflies or experiment with some values.


Step 38

Then create a new layer and set it to blending mode "Linear Dodge (Add)" and paint some brown ("3e1d0a ") strokes on neck (using soft brush), shoulder and some on butterflies wings, use "Eraser tool" to soften the edges like below.


Step 39

Change brush to hard round, make it smaller (5px) and make some dots with the same color ("3e1d0a") like before, also on new layer (with blending mode "Linear Dodge (Add)"). Do the same around other butterflies.


Step 40

Now copy "birds stock" paste some birds (delete blue areas with "Eraser tool" and "Magic wand tool") hit Command/Ctrl + T, scale them down and place them like below. Also make mask on this layer and with use of black soft big round brush, delete some birds around the center, then lower the opacity of this layer to about 60%.


Create a Scenic Landscape Composition in Photoshop Part-3

0 komentar di 05.51 - Edit entry?
Create a Scenic Landscape Composition in Photoshop Part-3


Step 21

Because of blending problems on the top of cliff (overlapping layers and dark areas between the trees) duplicate (Command/Ctrl + J) fragment of trees layer and hit Command/Ctrl + T and flip it horizontally (right click > "Flip horizontal") then move this layer higher than "trees" layer (image 1) so it covers "broken" area (image 2) then start erasing some fragments so finally it turned out like in image 3.


Step 22

Create new layer (blending mode "Linear Dodge (Add)" )and draw some spots of "1b6f71" color, then lower the opacity to about 30%.


Step 23

Use "Clone tool" to cover the tree on left side (on duplicated trees layer) so it won’t look like 100% copy of right side.


Step 24

Also select (using "Lasso tool") and duplicate leaf from trees layer, flip it horizontally and move to right side. Erase some hard highlighted edges. It’s another step in making side left different from side right.


Step 25

Now copy some thin tree fragment from "laying trees stock" and put it like this, on layer "fake tree", then hit Command/Ctrl + B and set values like in image below.


Step 26

Some changes after Brightness/Contrast and Burn tool treatment (Midtones setting).


Step 27

Then erase some edges of this "fake tree" by making mask on its layer and painting some strokes with 80% hard round brush (black). After that lighten up right edge of this tree (since light is coming from right side) and then do some Hue/Saturation changes (Command/Ctrl + U) as below:


Step 28

Duplicate "fake tree" layer, scale it down a bit and rotate like below, then (still in Free Transform mode) right-click on this (well, it’s a branch now) branch and select "Warp" then go to menu on top of Photoshop UI and select "Arch" .


Step 29

Now simply push it to right-down side and bend it like in this image, if you can’t bend it as shown in the image, change the warping orientation by clicking icon on top of Photoshop UI (image below).


Step 30

Light up this branch by going to "Levels" window (Command/Ctrl + L).


Create a Scenic Landscape Composition in Photoshop Part-2

0 komentar di 05.18 - Edit entry?
Create a Scenic Landscape Composition in Photoshop Part-2

 
Step 11

Go back to left side of image and paste "small trees" stock here, resize it (Command/Ctrl + T) and go for Color balance (Command/Ctrl + B) and select settings: and brightness + 73 in "Brightness/Contrast" window. Then do some erasing job around tree so finally it looks like this: 


Step 12

Use "Crop Tool" and resize our document, then hit Command/Ctrl + T and resize cliff layer to hide empty space on the top of document. Simply stretch it upwards to make it higher.


Step 13

Erase some unnecessary parts on layer with trees.


Step 14

Paste our "ocean" stock on right side and use following settings for Brightness/Contrast to roughly blend it with our image. Hit Command/Ctrl + B and select values for "Midtones" and for "Highlights". 


Step 15

Open up "Liquify filter" (Shift + Ctrl + X) on girl layer and warp her lips upwards, also move her ear upwards to make it look like an Elven ear.
Adsense Indonesia


Step 16

Add a mask on layer with cliff and basically erase it in half, then lighten up edges of it by drawing strokes of brown color ("3e1d0a") on new layer with “Linear Dodge (Add)” blending setting, so It will look like this:


Step 17

On layer with girl – select some branches and again hit Command/Ctrl + B (Color Balance) to change color of these. I used values for "Shadows", for "Midtones" and for "Highlights" Then hit Command/Ctrl + U (Hue/Saturation) and select these settings:


Step 18

Another thing here is shadow behind girl – Do it by painting "17120a" color strokes on new layer (“shadow girl”), and then set this layer to "hard light" blending.


Step 19

Create new layer and set it’s blending to "Linear Dodge (Add)" and paint some strokes of dark-brown color like "3e1d0a". It will create glowing effect on trees and branches, also you can use "Dodge Tool" on setting "Highlight" to lighten up some areas where light should be visible, like trees edges, cliff edges and some areas on our girl-model stock. Check out image below.


Step 20

Create new layer and draw some strokes on ocean with soft brush, use light color like "d6e4c1" and then, lower the opacity at this layer (about 30%) to create fog effect, create another layer and do the same on trees, then create mask on this layer and erase parts like closer trees or leaves. You can blur this mask (Gaussian Blur) to give it smooth look.